This is a no-code integration. Visit our no-code academy to learn more.
How to: Call leads in Callpage when they enter your pipeline
Ensure that every time a new lead is created in your noCRM account, you engage with them promptly by automating the process of adding them to your CallPage dialer. By following the steps below, you can build the workflow from scratch and streamline your lead management process for maximum efficiency and responsiveness.
- If you don’t have an account with noCRM.io, click here to start a free trial.
- If you don't have an account with Zapier, click here to sign up for a free trial.
- If you don't have an account with CallPage, click here to open a free account.
1| Build the workflow from scratch:
To create an effective workflow, you need a trigger that sets off the desired action(s). In this case, when a lead is added to your noCRM pipeline, it will automatically trigger the creation of a call in your CallPage account. This integration enables you to seamlessly connect your lead generation and lead management systems.
Create your Trigger:
Sign in to your Zapier account and initiate the workflow creation process by clicking on the "Create Zap" button located in the top-left corner of the page. This will guide you through the necessary steps to set up the automation.
Select the "noCRM" app as App Event and choose the Trigger Event "New Lead" to ensure that the trigger is activated whenever a new lead is generated in your noCRM account.
I. Connect your noCRM account
To establish the integration between Zapier and your noCRM account:
- Enter your account name (https://AccountName.nocrm.io)
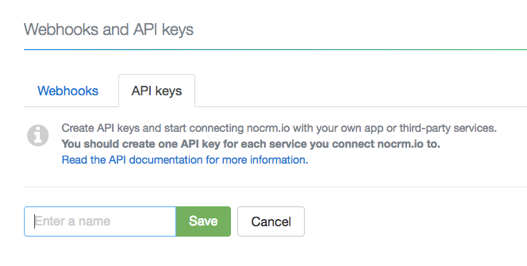
- Enter your API Key. To find your API key, go to your noCRM account > Admin Panel > Integrations > API > API Keys then click on the Create an API Key button and name it.
This step enables Zapier to communicate and retrieve data from your noCRM account seamlessly.
Note: If you wish to limit the creation of contacts to specific pipelines, you can add an additional action called "Filter" at this stage. By specifying the name of the desired pipeline, you can ensure that only leads from that pipeline are considered in the workflow.
Create your Action:
The primary objective is to establish an immediate callback to your new noCRM lead, minimizing the time it takes to connect with them.
Select the "CallPage" as the App Event and choose the Trigger Event "Create Call". This selection ensures that when a new lead is added to your noCRM account, the corresponding action will be triggered, leading to the initiation of a call.
I. Connect your CallPage account:
Enable the integration between Zapier and your CallPage account by following the instructions provided on the Zapier page. This process allows Zapier to securely access your CallPage account and perform the necessary actions.
II. Set up your Action:
The crucial step in this process is selecting the right CallPage Widget or CallPage Virtual Number that will be used for the callback. Within the Widget section, choose the option that aligns with your preferences and requirements. In the Phone number section, insert the data from the trigger app (noCRM) that contains the lead's phone number in the correct international number format.
Please note: It is essential to ensure that phone numbers are collected in the proper international format to facilitate CallPage's ability to initiate callbacks seamlessly. This step is crucial for successful calls.
Once you have completed the above steps, your workflow setup is now complete! This automation will ensure that whenever a new lead is created in your noCRM account, they will be automatically added to your CallPage dialer, allowing you to contact them promptly and increase your chances of converting leads into valuable customers.